PiD: Fast and High-Resolution Latent Decoding with Pixel Diffusion
Paper: arXiv:2605.23902 Code: nv-tlabs/PiD Code reference:
main@66d8ba2c(2026-05-25)
1. Motivation (研究动机)
Latent Diffusion Model 的主干已经很强,但最终图像质量仍被 latent-to-pixel decoder 卡住:LDM 在低维 latent 中生成,再由 VAE / RAE decoder 还原到像素;这个 decoder 往往只是“重建器”,目标是尽量反演 encoder,而不是像生成模型一样补全高频纹理、修复 latent 里的局部伪影或直接合成更高分辨率细节。PiD 这篇论文把问题定义在这个被长期低估的接口上:如果 latent 已经提供语义布局,decoder 是否可以不只是还原 latent,而是成为一个条件像素生成器?
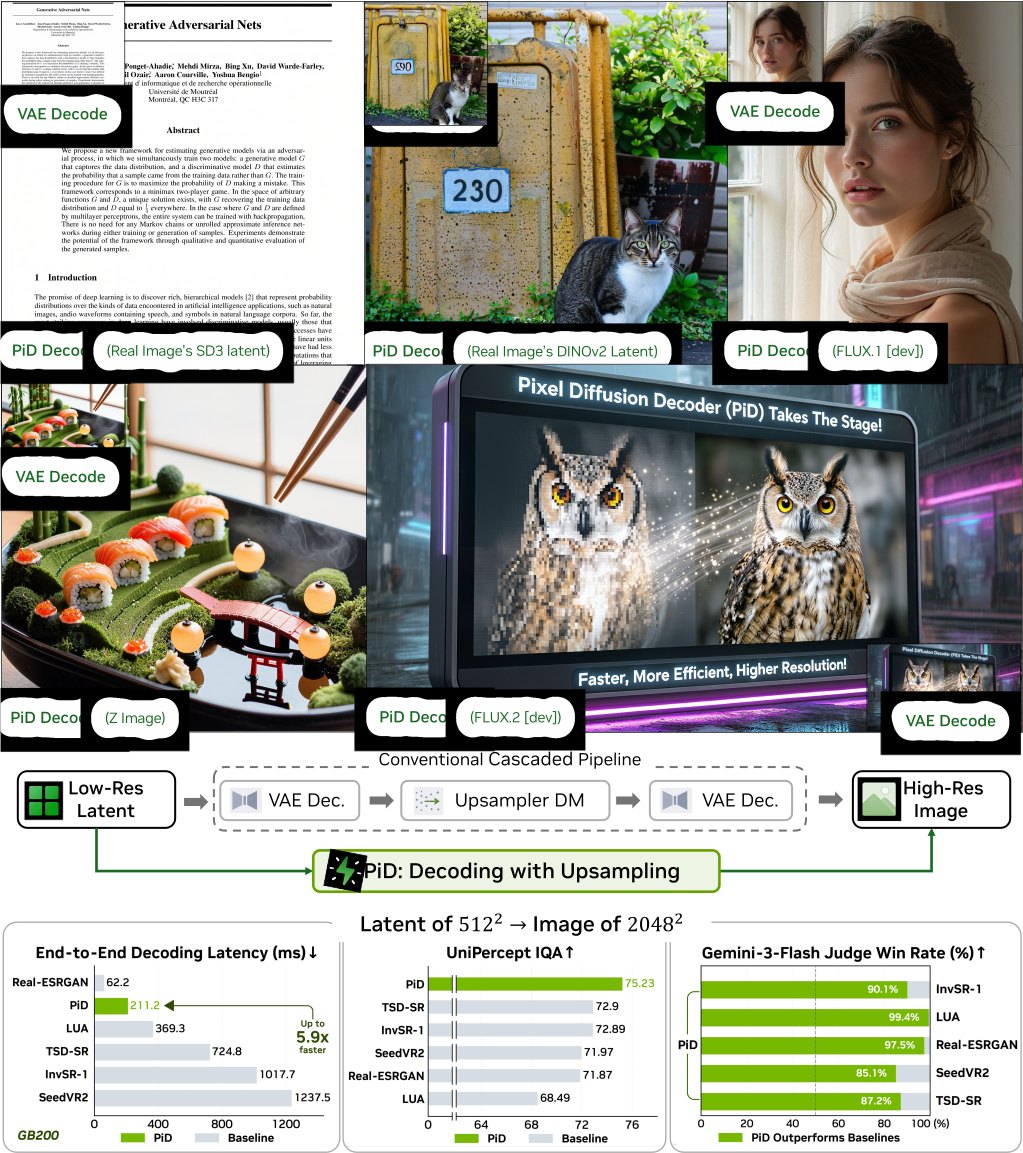
Figure 1 解读:论文的 teaser 把 PiD 的定位说得很清楚:输入可以是 VAE latent,也可以是 DINOv2 / SigLIP 这类 vision encoder latent;输出不是常规 decoder 的低分辨率重建,而是直接得到更高分辨率、更锐利的像素图。也就是说,PiD 不是在原有 VAE decoder 后面再接一个 SR 模型,而是把“解码”和“放大”合并成一个 pixel diffusion decoding stage。
现有 decode-then-upsample 流程有三个具体瓶颈。第一,VAE decoder 的 reconstruction loss 会不可避免地损失小字、纹理、边缘等 fine-grained details;当 latent 本身来自生成模型而非真实图像编码时,decoder 还可能把 latent 的噪声和结构错误直接放大。第二,高分辨率场景下,传统 decoder 的显存和延迟并不总是便宜,FLUX.1 VAE 在约 分辨率附近会在 80GB GPU 上无 tiling OOM。第三,RAE / semantic latent 的语义很强但外观欠定,普通 decoder 很难凭这些 latent 重建完整像素细节。
这篇论文要解决的目标是:给定已经采样出来或部分采样出来的 latent 与文本条件 ,直接用一个 pixel-space diffusion decoder 生成目标分辨率图像 ,同时允许 base LDM 提前终止,把还没完全 denoise 的 latent 交给 PiD 补足细节。这个问题值得研究,因为它把高分辨率生成的成本从“高分辨率 LDM 全流程采样”转移到“低分辨率 latent 采样 + 快速像素扩散解码”,如果成立,就能让 甚至 4K 输出在延迟、显存和视觉细节之间取得更好的折中。
2. Idea (核心思想)
核心 insight 是:latent decoder 不必被限定为 deterministic / reconstruction-oriented 的 autoencoder decoder;它可以是一个被 latent 条件控制的 pixel diffusion prior。latent 负责全局语义、构图和对象布局,pixel diffusion prior 负责在目标分辨率上生成局部纹理和高频细节。
PiD 的关键创新是把 latent decoding 与 spatial upsampling 合并为一个 latent-conditioned rectified-flow / pixel diffusion 模型:先预训练高分辨率 PixelDiT text-to-image prior,再加一个 sigma-aware latent adapter,把带噪 latent 注入 PixelDiT 的 patch-token blocks,最后用 DMD2 蒸馏成 4-step student。和传统 VAE decode + Real-ESRGAN / SeedVR / TSD-SR / InvSR 级联相比,PiD 不在已经损失细节的低分辨率像素图上做后处理,而是在生成像素的过程中直接利用 latent 和文本条件。
与普通 super-resolution 的根本差异在于条件源不同:SR 方法看到的是 VAE decoder 产出的低分辨率图像,很多小字和纹理已经被 decoder 损坏;PiD 看到的是原始 latent(甚至 partially denoised latent)和文本条件,能在 latent 仍保留语义结构时生成细节。与 native LDM 直接生成相比,PiD 则把昂贵的高分辨率全程采样换成低分辨率 latent 采样加 4-step pixel decoder。
3. Method (方法)
3.1 Overall framework:把 decoder 改写成 latent-conditioned pixel diffusion
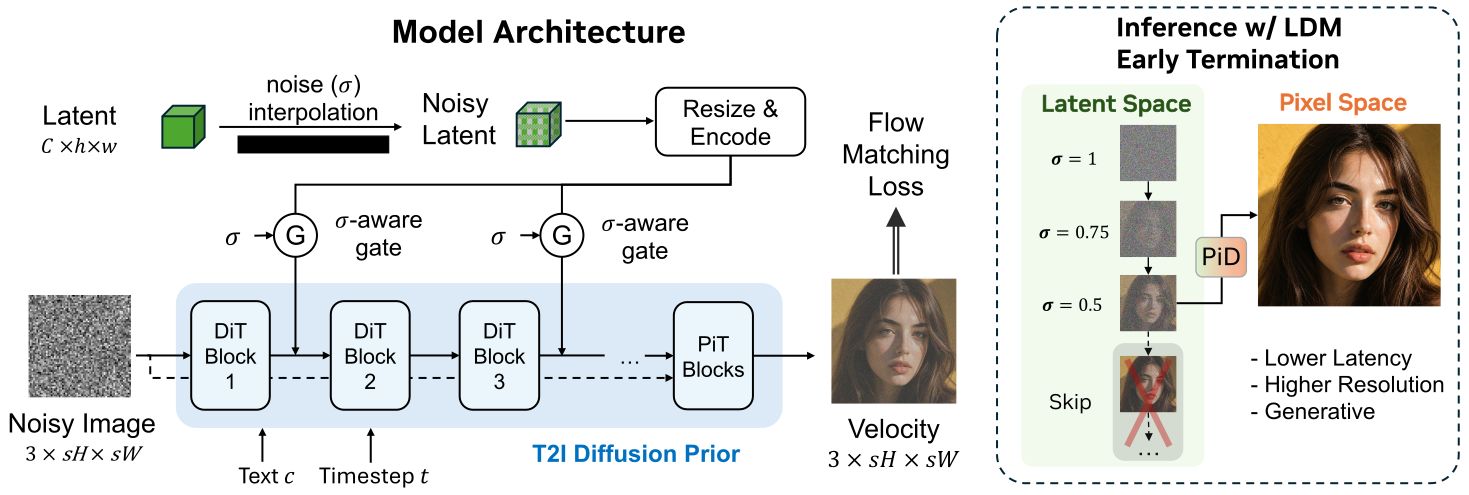
Figure 2 解读:PiD 的主路径是:base LDM / RAE generator 先在 latent space 中采样 latent;PiD 接收 noisy target-resolution image 、文本条件 、latent 条件 及其噪声水平 ,预测 pixel-space rectified-flow velocity;latent adapter 把 low-resolution latent 对齐到 PixelDiT 的 patch-token grid,再通过 sigma-aware gate 注入每个 transformer block。图中最重要的是右侧的 early-exit:base LDM 不必跑满所有 denoising steps,PiD 在训练时见过不同噪声水平的 latent,因此能从 partially denoised latent 继续生成目标分辨率像素。
形式上,常规 latent pipeline 先做 必要时再接一个 SR 模型。PiD 把目标改成条件生成分布 :在每个 pixel denoising step,它在目标分辨率的 patch grid 上预测 velocity,而不是调用一个固定 decoder。直觉上,latent 是“草图和语义约束”,pixel prior 是“会画细节的生成器”;二者通过 gate 动态融合,避免 latent 太干净时过拟合重建,也避免 latent 太 noisy 时污染像素生成。
3.2 Pixel diffusion prior:先学会高分辨率像素生成
PiD 先训练一个高分辨率 pixel diffusion prior。论文使用 standard rectified-flow objective:给 clean image 和文本 ,采样 与 Gaussian noise ,构造 模型预测 velocity field 并最小化 这一步的作用不是解码 latent,而是给后续 decoder 一个强 pixel-space text-to-image prior。Ablation 显示去掉这个 T2I prior 后,FLUX.1 [dev] 上 NIQE 从 恶化到 ,VisualQuality-R1 从 降到 ,说明 PiD 的细节生成能力主要来自这个高分辨率像素 prior,而不是简单插值 latent。
3.3 Noisy latent conditioning:让 decoder 学会“不完全相信 latent”
PiD 不只用 clean latent 训练,而是对 latent 加不同强度噪声: 实验中 。这个设计有两个作用:第一,防止 decoder 过度依赖 latent 的局部细节,因为 generated latent 可能带伪影;第二,让模型在训练时见过“质量不等”的 latent,因此 inference 时可以吃 base LDM 的 intermediate latent,实现 early exit。
训练 latent-conditioned decoder 时,PiD 从 pretrained pixel prior 出发,联合微调 diffusion backbone 和 latent injection modules,目标仍是 rectified-flow loss,但输入条件扩展为: 注意这里的 不是 pixel denoising time ,而是 latent corruption level。PiD 把它传给 injection gate,使模型能在 latent 越 noisy 时越少相信 latent,在 latent 越 clean 时更强地利用 latent。
3.4 Latent projection 与 sigma-aware gating
论文和代码都把 latent adapter 实现为 ControlNet-style 2D convolutional path。输入 noisy low-resolution latent 后,adapter 先把 latent resize 到 PixelDiT patch grid;对 FLUX 类 VAE latent,实验配置中 latent 通道数为 16。随后 latent 经过:Conv2d(16→512, 3×3)、SiLU、Conv2d(512→512, 3×3)、四个 pre-activation residual blocks(GN_4 → SiLU → Conv_3×3 → GN_4 → SiLU → Conv_3×3),再被 flatten / projected 成每个 PixelDiT block 可注入的 token features。
代码中的 LQProjection2D 更明确地处理了不同 latent / image branch 的空间对齐:image branch 用 PixelUnshuffle 或 PixelShuffle 对齐 low-quality image 与 patch grid;latent branch 若 latent resolution 高于 patch grid,就 fold 空间元素进 channel,否则用 nearest interpolation 上采样。输出是一组 per-block features;PidNet._run_patch_blocks 在每个可注入 block 调用 gate,把对应 LQ/PiD token feature 加到主 hidden state。
代码中的 sigma-aware gate 公式可以概括为:
其中 是 PixelDiT hidden token, 是 adapter 产生的 latent token feature。released code 的 SigmaAwareGatePerTokenPerDim 初始化 content_proj.bias=2.0、log_alpha=log(5);因此 时 gate 大约是 , 时约 , 时约 。这与论文动机一致:latent 噪声越大,注入越弱。
3.5 Early-exit decoding:从 partially denoised latent 接力
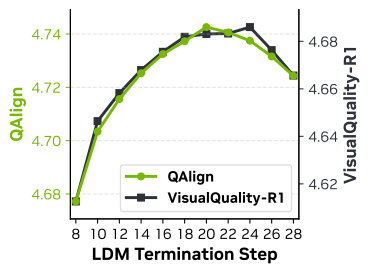
Figure 3 解读:这张图评估 FLUX.1 [dev] 总共 个 latent denoising steps 中,在哪一步交给 PiD 最好。结论不是越早越好,也不是跑满最好;论文发现最后 3–5 步附近的 intermediate latent 质量最好:太早时语义还没成形,太晚时 latent 已经像 VAE reconstruction 一样固定,留给 PiD “想象细节”的空间变小,同时总延迟增加。
PiD 的 early-exit 推理流程是:base LDM 运行到第 步,保存当前 latent 及对应噪声水平;PiD 把 当作 noisy latent condition,进行 4-step pixel diffusion decoding。表格中常见的 PiD(24/28) 就表示 FLUX.1 / SD3 等 28-step LDM 在第 24 步提前交给 PiD;PiD(45/50) 表示 50-step LDM 在第 45 步交给 PiD。
3.6 Distillation:把 multi-step decoder 压到 4 steps
为了让 pixel diffusion decoder 真正可用,论文把 multi-step latent-conditioned teacher 蒸馏成 4-step student。4-step student 使用 sigma schedule 蒸馏参考 DMD2,并在中间特征上加 projected GAN regularization。discriminator 是 26-block、hidden dimension 1536 的 DiT;DMD loss weight 为 1.0,denoising score matching loss weight 为 1.0,GAN loss weight 为 0.05,R1 regularization weight 为 200.0。student 与 fake-score network 从同一 teacher architecture/checkpoint 初始化,AdamW 常数学习率 ,weight decay ,batch size 16,训练 3,000 iterations,用 128 H100 和 context parallelism 8 约 2 小时。
released code 的 PidDistillModel 是 inference subset:保留 4-step student sampler、CFG、latent encoding 与 checkpoint loading,但注释明确说 training-time teacher / fake-score / discriminator / DMD-loss machinery 没有发布。因此笔记里的蒸馏 loss 与训练超参来自论文和 arXiv source,而不是可运行的训练 launcher。
3.7 Pseudocode (based on released code)
Code reference:
main@66d8ba2c(2026-05-25) — pseudocode and mapping based on this commit
import torch
import torch.nn.functional as F


def corrupt_latent(z: torch.Tensor, sigma_max: float = 0.8):
    """Paper Eq. latent noise; training path is described in paper, not released."""
    b = z.shape[0]
    sigma = torch.rand(b, device=z.device, dtype=z.dtype) * sigma_max
    noise = torch.randn_like(z)
    view = (b,) + (1,) * (z.ndim - 1)
    z_tilde = (1.0 - sigma.view(view)) * z + sigma.view(view) * noise
    return z_tilde, sigma


def sigma_aware_gate(x: torch.Tensor, lq: torch.Tensor, sigma: torch.Tensor,
                     content_proj, log_alpha: torch.Tensor):
    """Matches SigmaAwareGatePerTokenPerDim in lq_projection_2d.py."""
    content_logit = content_proj(torch.cat([x, lq], dim=-1))
    sigma_offset = -log_alpha.exp() * sigma.float().view(-1, 1, 1)
    gate = torch.sigmoid(content_logit + sigma_offset)
    return x + gate * lq
import torch
import torch.nn as nn
import torch.nn.functional as F
class LQProjection2DLike(nn.Module):
"""Simplified LQProjection2D: align latent/image to PixelDiT patch tokens."""
def __init__(self, latent_proj, blocks, output_heads, patch_size=16,
sr_scale=4, latent_spatial_down_factor=8):
super().__init__()
self.latent_proj = latent_proj
self.blocks = blocks
self.output_heads = output_heads
self.patch_size = patch_size
self.sr_scale = sr_scale
self.latent_spatial_down_factor = latent_spatial_down_factor
def align_latent_to_patch_grid(self, z, target_pH, target_pW):
# Released code folds latent if possible; otherwise nearest-upsamples.
if z.shape[-2:] != (target_pH, target_pW):
z = F.interpolate(z, size=(target_pH, target_pW), mode="nearest")
return self.latent_proj(z)
def forward(self, lq_latent, target_pH, target_pW):
h = self.align_latent_to_patch_grid(lq_latent, target_pH, target_pW)
for block in self.blocks:
h = block(h)
tokens = h.flatten(2).transpose(1, 2)
return [head(tokens) for head in self.output_heads]class PidNetLike(nn.Module):
"""Simplified PidNet patch-block loop with ControlNet-style LQ injection."""
def __init__(self, lq_proj, patch_blocks):
super().__init__()
self.lq_proj = lq_proj
self.patch_blocks = patch_blocks
def forward_patch_blocks(self, s_main, condition, lq_latent, degrade_sigma):
pH, pW = condition["patch_grid"]
lq_features = self.lq_proj(lq_latent=lq_latent, target_pH=pH, target_pW=pW)
for i, block in enumerate(self.patch_blocks):
if self.lq_proj.is_gate_active(i):
j = self.lq_proj._get_output_index(i)
if j < len(lq_features):
s_main = self.lq_proj.gate(
s_main, lq_features[j], sigma=degrade_sigma, out_idx=j
)
s_main = block(s_main, condition)
return s_main@torch.no_grad()
def pid_early_exit_decode(ldm_pipe, pid_student, prompt, K, total_steps=28, pid_steps=4):
"""Released demos implement this pattern via from_ldm_* and _demo_common.py."""
latent_K, sigma_K = ldm_pipe.sample_and_capture_latent(
prompt=prompt,
num_inference_steps=total_steps,
save_xt_step=K,
)
batch = {
"caption": [prompt],
"LQ_latent": latent_K,
"degrade_sigma": torch.as_tensor([sigma_K], device=latent_K.device),
}
image = pid_student.generate_samples_from_batch(
batch,
cfg_scale=1.0,
num_steps=pid_steps,
image_size=(2048, 2048),
seed=0,
)
return image3.8 Code-to-paper mapping
Code reference:
main@66d8ba2c(2026-05-25) — pseudocode and mapping based on this commit
| Paper Concept | Source File | Key Class/Function |
|---|---|---|
| PiD inference model wrapper / latent encoding | pid/_src/models/pid_model.py | PidModel, encode_lq_latent, generate_samples_from_batch parent path |
| 4-step distilled student inference | pid/_src/models/pid_distill_model.py | PidDistillModel, _sample_student, _get_t_list, generate_samples_from_batch |
| PixelDiT with LQ/latent injection | pid/_src/networks/pid_net.py | PidNet, _compute_lq_features, _run_patch_blocks |
| Latent projection and sigma-aware gate | pid/_src/networks/lq_projection_2d.py | LQProjection2D, SigmaAwareGatePerTokenPerDim, _build_gate |
| Conditioner dropout for caption / LQ latent | pid/_src/configs/pid/defaults/conditioner_pid.py | Pid_CaptionLQ_Config, Pid_LQOnly_Config |
| Inference experiment config per backbone | pid/_src/configs/pid/experiment/*.py, pid/_src/configs/pid/experiment_2kto4k/*.py | FLUX / SD3 / FLUX2 / RAE / Scale-RAE config overrides |
| LDM early-exit demos | pid/_src/inference/from_ldm_*.py, pid/_src/inference/_demo_common.py | run_from_ldm_diffusers, XtCaptureCallback, --save_xt_steps, --pid_inference_steps |
| Released checkpoints and backbone registry | pid/_src/inference/checkpoint_registry.py, pid/_src/inference/pipeline_registry.py | checkpoint path resolution, default steps/resolution/guidance |
论文公式与 released code 实现差异:released repo 是推理版实现,包含 PiD / PixelDiT / adapter / distilled student / demos / checkpoint registry,但没有发布论文训练阶段的 teacher、fake-score network、discriminator、DMD loss、optimizer launcher 或完整 training loop。因此 §4 中 batch size、LR、GPU、DMD/R1 weights 等训练数值只能按论文 source 记录;代码只能验证推理结构、latent injection、sigma-aware gate、4-step student sampler 和各 backbone demo 配置。
4. Experimental Setup (实验设置)
4.1 Data
训练数据来自 MultiAspect-4K-1M、rendered PDF data 与内部采购的高分辨率图像。作者用 Q-Align 过滤低质量样本后得到 M high-quality images;论文没有分别给出每个来源的独立样本数。训练时按 aspect ratio 分桶:16:9、4:3、1:1、3:4、9:16;对应 center-crop 分辨率为 、、、、。每张图标注三种长度 caption:prompt 200–300 words、prompt_medium 50–200 words、prompt_short 小于 50 words;训练时均匀采样不同 caption length。captioning 使用 Qwen3-VL-8B-Instruct,经 LMDeploy TurboMind 批处理。
4.2 Models and baselines
PiD 在三类 VAE latent 与两类 vision-encoder latent 上测试:FLUX.1 VAE + FLUX.1 [dev],SD3 VAE + Stable Diffusion 3 Medium,FLUX.2 VAE + FLUX.2 [dev],FLUX.1 VAE + Z-Image,DINOv2 + DiT,SigLIP + Scale-RAE。所有主要 generation experiments 都在“latent 来自生成模型采样而非真实图像编码”的设置下评估。
主要 baselines 包括:LUA;VAE Dec. + Real-ESRGAN、VAE Dec. + SeedVR2-3B、VAE Dec. + TSD-SR、VAE Dec. + InvSR-1;SSDD + Real-ESRGAN / SeedVR2-3B / TSD-SR / InvSR-1;对 RAE latent 使用 RAE Dec. + Real-ESRGAN / SeedVR2-3B / TSD-SR / InvSR-1。定性对比还包括 native PixelDiT 与 FLUX.2。
4.3 Metrics and latency
论文使用八个 no-reference image-quality metrics:MUSIQ (PaQ-2-PiQ variant)、NIQE、DEQA、MANIQA、Q-Align、Unipercept-IAA、Unipercept-IQA、VisualQuality-R1。MUSIQ / DEQA / MANIQA / Q-Align / Unipercept / VisualQuality-R1 越高越好,NIQE 越低越好。small-text reconstruction 还报告 PSNR、SSIM、LPIPS,其中 PSNR/SSIM 越高越好,LPIPS 越低越好。延迟以 ms 计,在单张 GB200 GPU 上报告 eager 与 torch.compile;benchmark Docker 为 nvcr.io/nvidian/pytorch:26.02-py3,CUDA 13.1.1,PyTorch 2.11.0。
4.4 Training config
Pixel diffusion prior 从 PixelDiT 官方 checkpoint (1.3B parameters) 初始化,并用本文数据 fine-tune。为适配高分辨率,timestep shift 从原 checkpoint 的 4 改为 6。backbone 使用 patch size 16、hidden size 1536、24 attention heads、14 MM-DiT image-text blocks、2 PiT pixel blocks;PiT branch 使用 16-dimensional pixel tokens、attention width 1152、16 heads。文本条件使用 frozen Gemma-2-2B-it encoder,text features 维度 2304,最大序列长度 300;RoPE 为 NTK-aware,reference resolution 。prior 训练 batch size 128,learning rate ,20,000 iterations,约 1 天,128 H100。
Latent-conditioned decoder 设置 ,batch size 64,learning rate ,30,000 iterations,约半天,64 H100;classifier-free guidance training 使用 10% caption dropout 与 10% latent-condition dropout。vision encoder latent 的实验中,作者发现冻结 PixelDiT backbone 比 full finetuning 色偏更小,因此采用 frozen backbone。蒸馏阶段的训练设置见 §3.6。released code 没有训练 launcher,因此这些训练配置按论文 source 记录;代码中可验证的是 inference configs、conditioner dropout 默认值和 adapter/gate 结构。
5. Experimental Results (实验结果)
5.1 Main quantitative results
主表显示 PiD 在六种 latent / generator setting 上大多数指标最好,并且 compiled latency 约 – ms。PiD 关键行如下:
| Setting | PiD exit | MUSIQ↑ | NIQE↓ | DEQA↑ | MANIQA↑ | Q-Align↑ | Uni-IAA↑ | Uni-IQA↑ | VQ-R1↑ | Eager ms | Compile ms |
|---|---|---|---|---|---|---|---|---|---|---|---|
| FLUX.1 VAE / FLUX.1 [dev] | 24/28 | 73.26 | 3.50 | 4.31 | 0.54 | 4.74 | 66.21 | 75.21 | 4.68 | 512.7 | 211.2 |
| SD3 VAE / SD3-medium | 24/28 | 74.00 | 3.11 | 4.26 | 0.56 | 4.66 | 62.57 | 74.22 | 4.59 | 501.4 | 214.0 |
| FLUX.2 VAE / FLUX.2 [dev] | 45/50 | 73.79 | 3.12 | 4.30 | 0.56 | 4.70 | 66.01 | 75.71 | 4.66 | 508.3 | 206.1 |
| FLUX.1 VAE / Z-Image | 45/50 | 74.08 | 3.26 | 4.29 | 0.56 | 4.68 | 63.96 | 75.23 | 4.64 | 498.3 | 211.2 |
| DINOv2 / DiT | 50/50 | 73.31 | 3.38 | 4.27 | 0.54 | 4.55 | 69.81 | 76.52 | 4.63 | 499.5 | 212.4 |
| SigLIP / Scale-RAE | 50/50 | 74.03 | 3.34 | 4.17 | 0.56 | 4.43 | 64.94 | 72.78 | 4.45 | 501.5 | 208.7 |
在 VAE latents 上,PiD 把 NIQE 从各自最强 baseline 的 降到 (FLUX.1、SD3、FLUX.2、Z-Image)。RAE-style semantic latents 上,SigLIP setting 的提升更能说明问题:相对 Scale-RAE decoder 相关 baseline,MUSIQ 从 到 ,DEQA 从 到 ,Unipercept-IAA 从 到 。作者解释为 Scale-RAE latent 语义强但外观不充分,PiD 的 pixel prior 可以补足生成能力。
5.2 MLLM pairwise judgment and qualitative comparisons
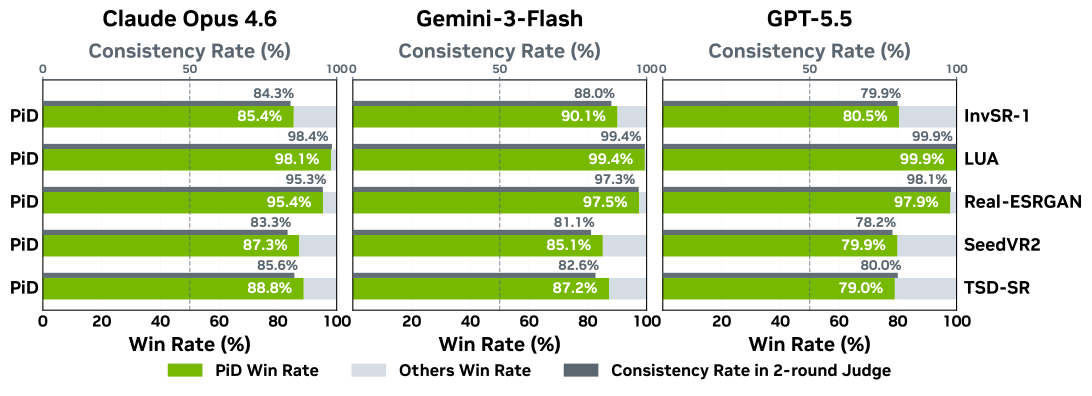
Figure 4 解读:三种闭源 MLLM 以 pairwise 方式比较 PiD 输出和 cascaded baseline(VAE decoder + SR),评价 perceptual quality 与 details。图中 PiD 获得稳定偏好,并且在交换 Image A/B 顺序后的 two-round consistency 较高。附录说明 judge prompt 要求重点看 sharpness、fine texture、noise、compression artifacts、ringing、blocking、over-smoothing、over-sharpening、edge halos;无效 verdict 会被排除,ties 不允许。
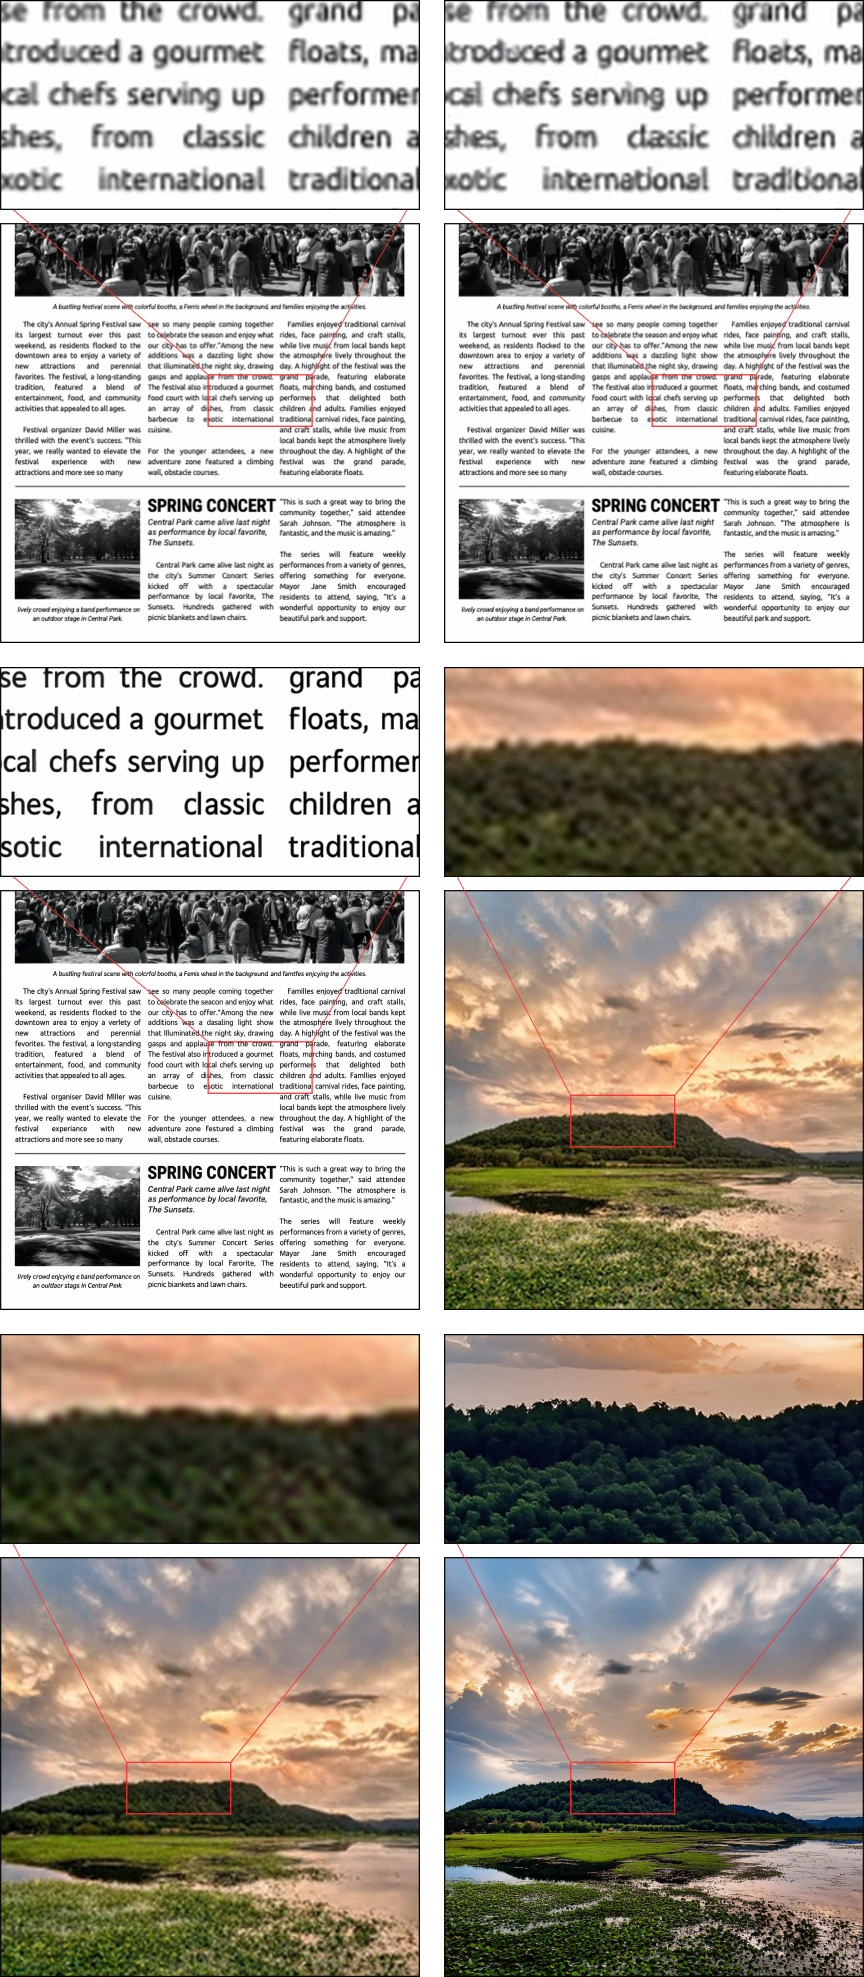
Figure 5 解读:这组 real-image latent reconstruction 展示两类情况:FLUX.1 VAE latent 与 SigLIP / RAE latent。列顺序分别是 input、原 decoder、PiD。PiD 的重点不是提高像素级 PSNR,而是把小字、边缘和纹理重建得更锐利;这也解释了后面 step ablation 中 PiD student 的 LPIPS 很低但 PSNR/SSIM 不一定最高。
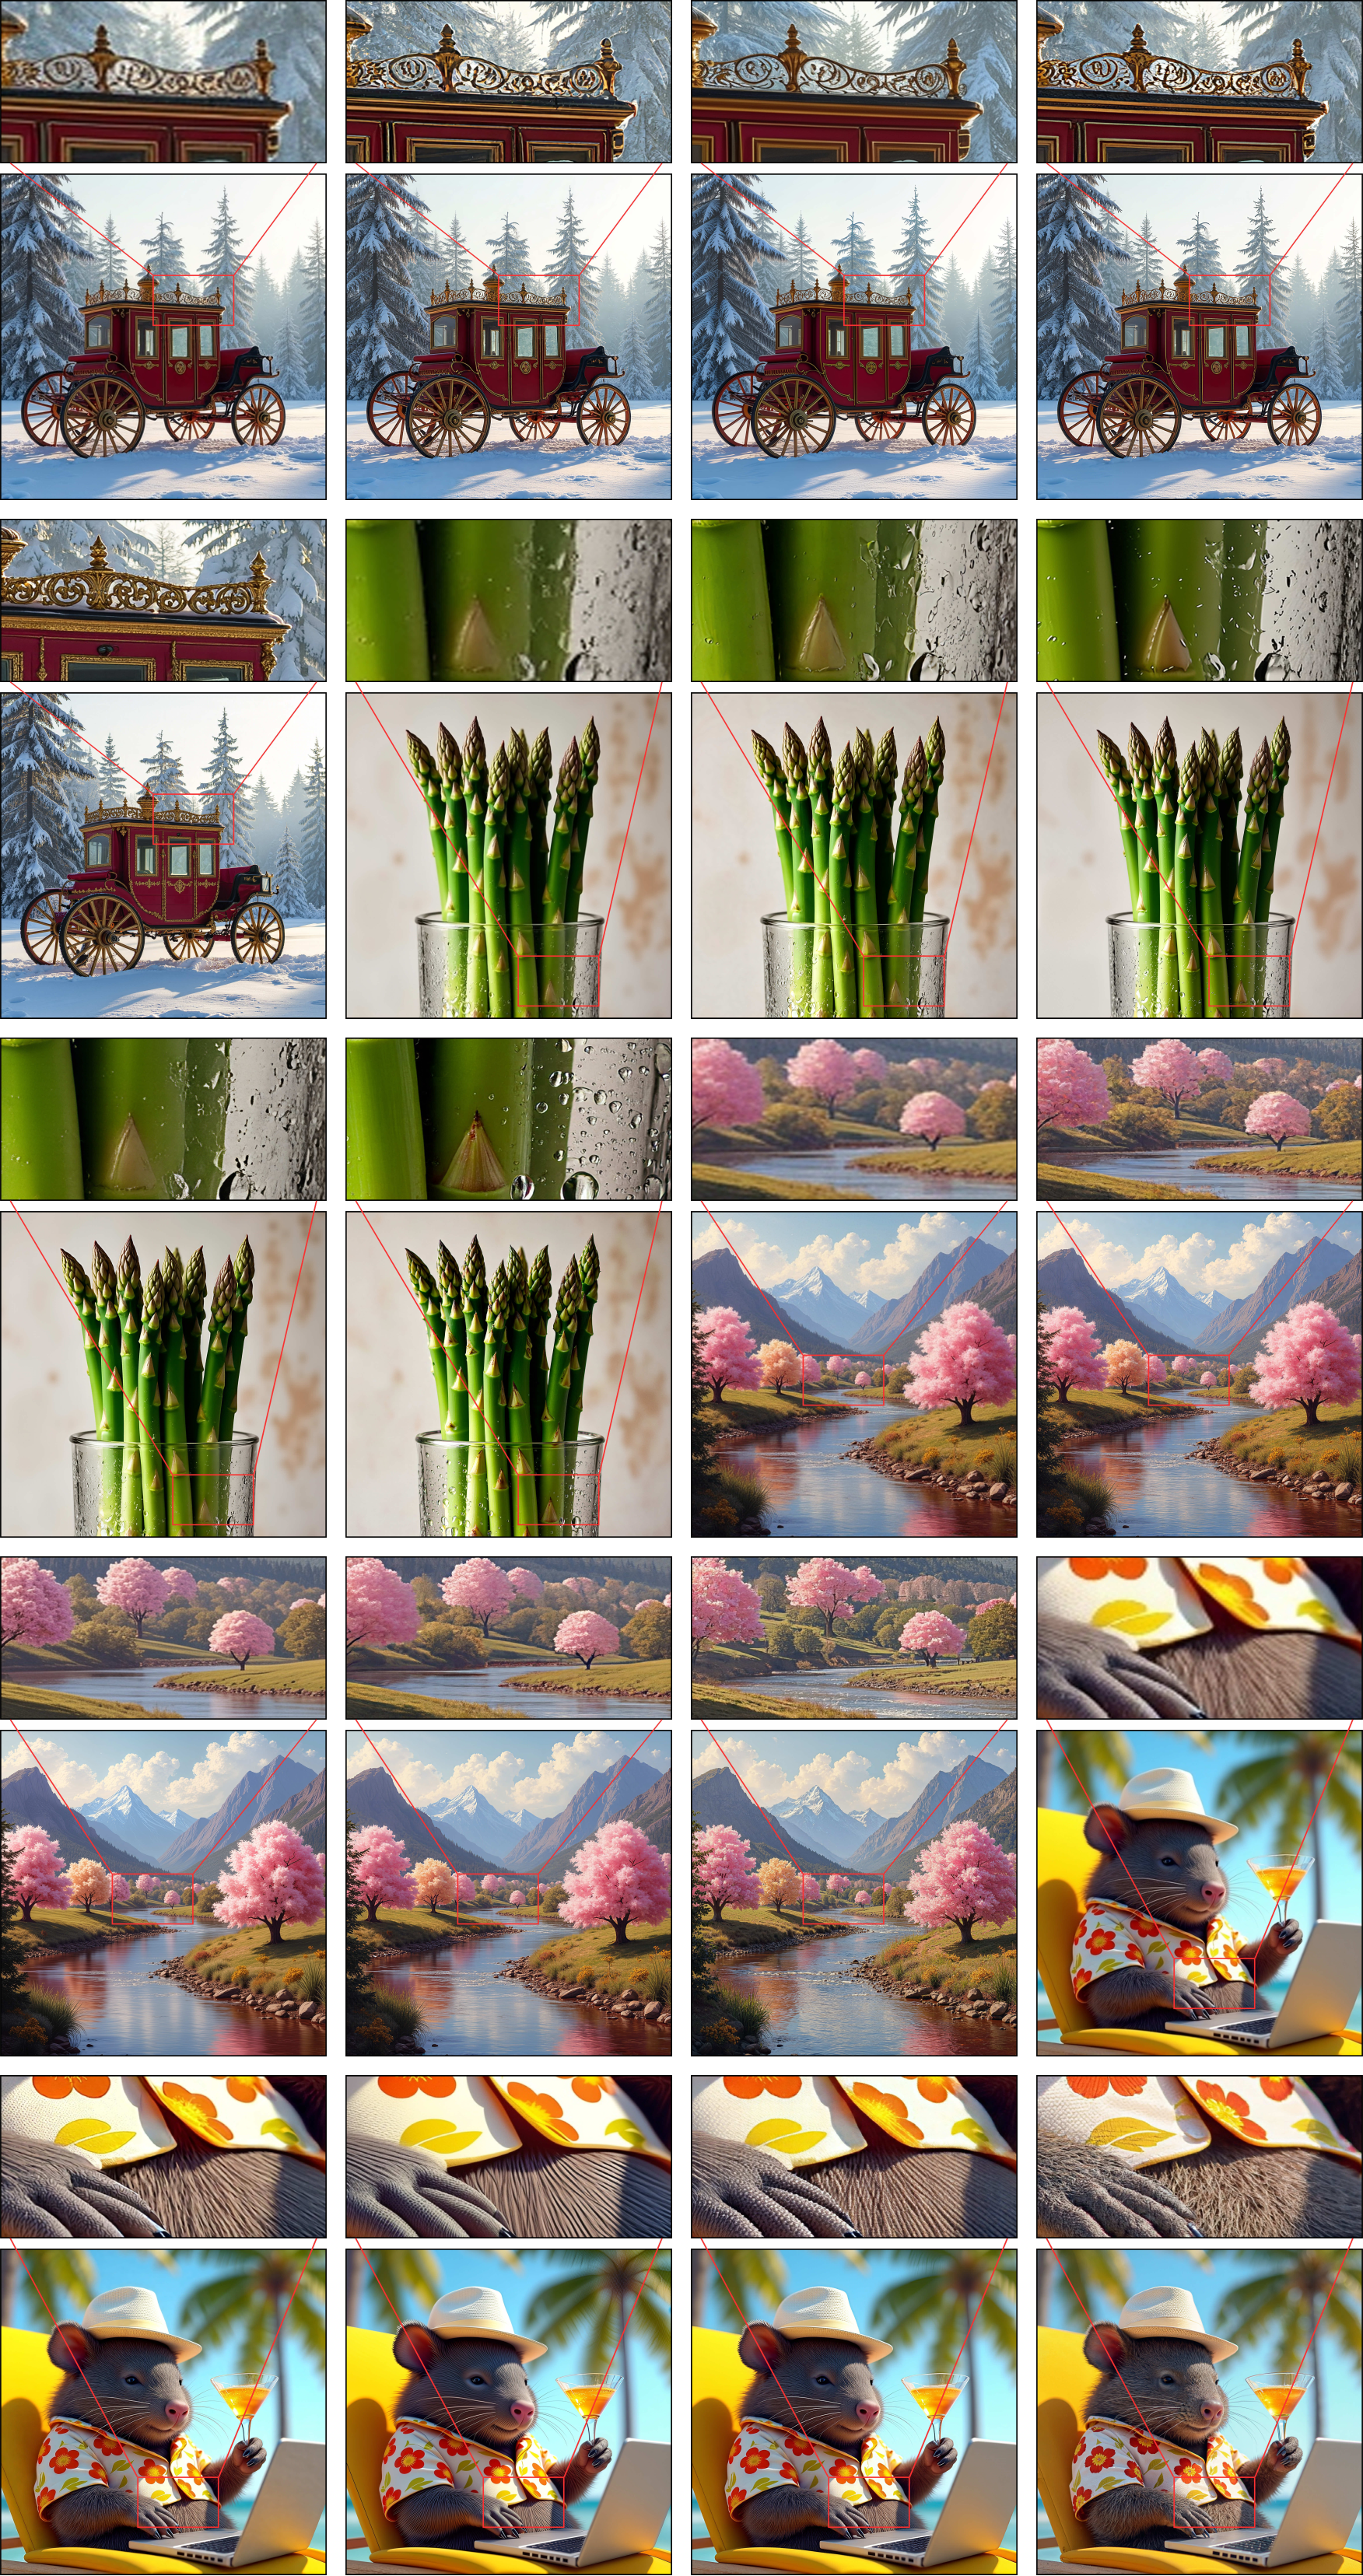
Figure 6 解读:这组图按行展示不同样例,按列比较 VAE Decode 、SeedVR2-3B、InvSR、TSD-SR 和 PiD 。PiD 的优势在于不是从低分辨率 VAE 输出修补,而是直接从 latent 生成 ,因此在细节锐度上更接近生成式重绘,同时 compiled latency 约 211.2 ms,明显低于 SeedVR2-3B 的约 1237.4 ms、InvSR 的约 1017.7 ms 和 TSD-SR 的约 724.7 ms。
5.3 Step ablation and early-exit behavior
| Model | Steps | MUSIQ↑ | NIQE↓ | DEQA↑ | MANIQA↑ | Q-Align↑ | Uni-IAA↑ | Uni-IQA↑ | VQ-R1↑ | PSNR↑ | SSIM↑ | LPIPS↓ |
|---|---|---|---|---|---|---|---|---|---|---|---|---|
| Teacher | 50 | 71.79 | 4.92 | 4.28 | 0.49 | 4.74 | 63.82 | 73.35 | 4.64 | 24.96 | 0.966 | 0.16 |
| Teacher | 25 | 71.63 | 5.43 | 4.29 | 0.49 | 4.75 | 63.36 | 73.26 | 4.65 | 25.00 | 0.965 | 0.18 |
| Teacher | 12 | 70.95 | 6.02 | 4.29 | 0.48 | 4.76 | 62.68 | 72.90 | 4.64 | 25.12 | 0.966 | 0.18 |
| Teacher | 8 | 70.32 | 6.31 | 4.29 | 0.47 | 4.75 | 62.15 | 72.51 | 4.64 | 25.24 | 0.964 | 0.19 |
| Teacher | 4 | 68.32 | 7.00 | 4.24 | 0.45 | 4.72 | 60.50 | 71.13 | 4.63 | 25.70 | 0.960 | 0.21 |
| Student | 4 | 73.26 | 3.50 | 4.31 | 0.54 | 4.74 | 66.21 | 75.21 | 4.68 | 24.19 | 0.964 | 0.09 |
4-step student 在 generation latent decoding 的 IQA 指标上超过多步 teacher:MUSIQ、NIQE、DEQA、MANIQA、Uni-IAA、Uni-IQA、VQ-R1 都是 student 最好或并列最强。small-text reconstruction 的结论更微妙:teacher 多步版本 PSNR/SSIM 更高,但 student LPIPS 最低(0.09),说明 student 更偏向感知质量和局部纹理,而非逐像素对齐。
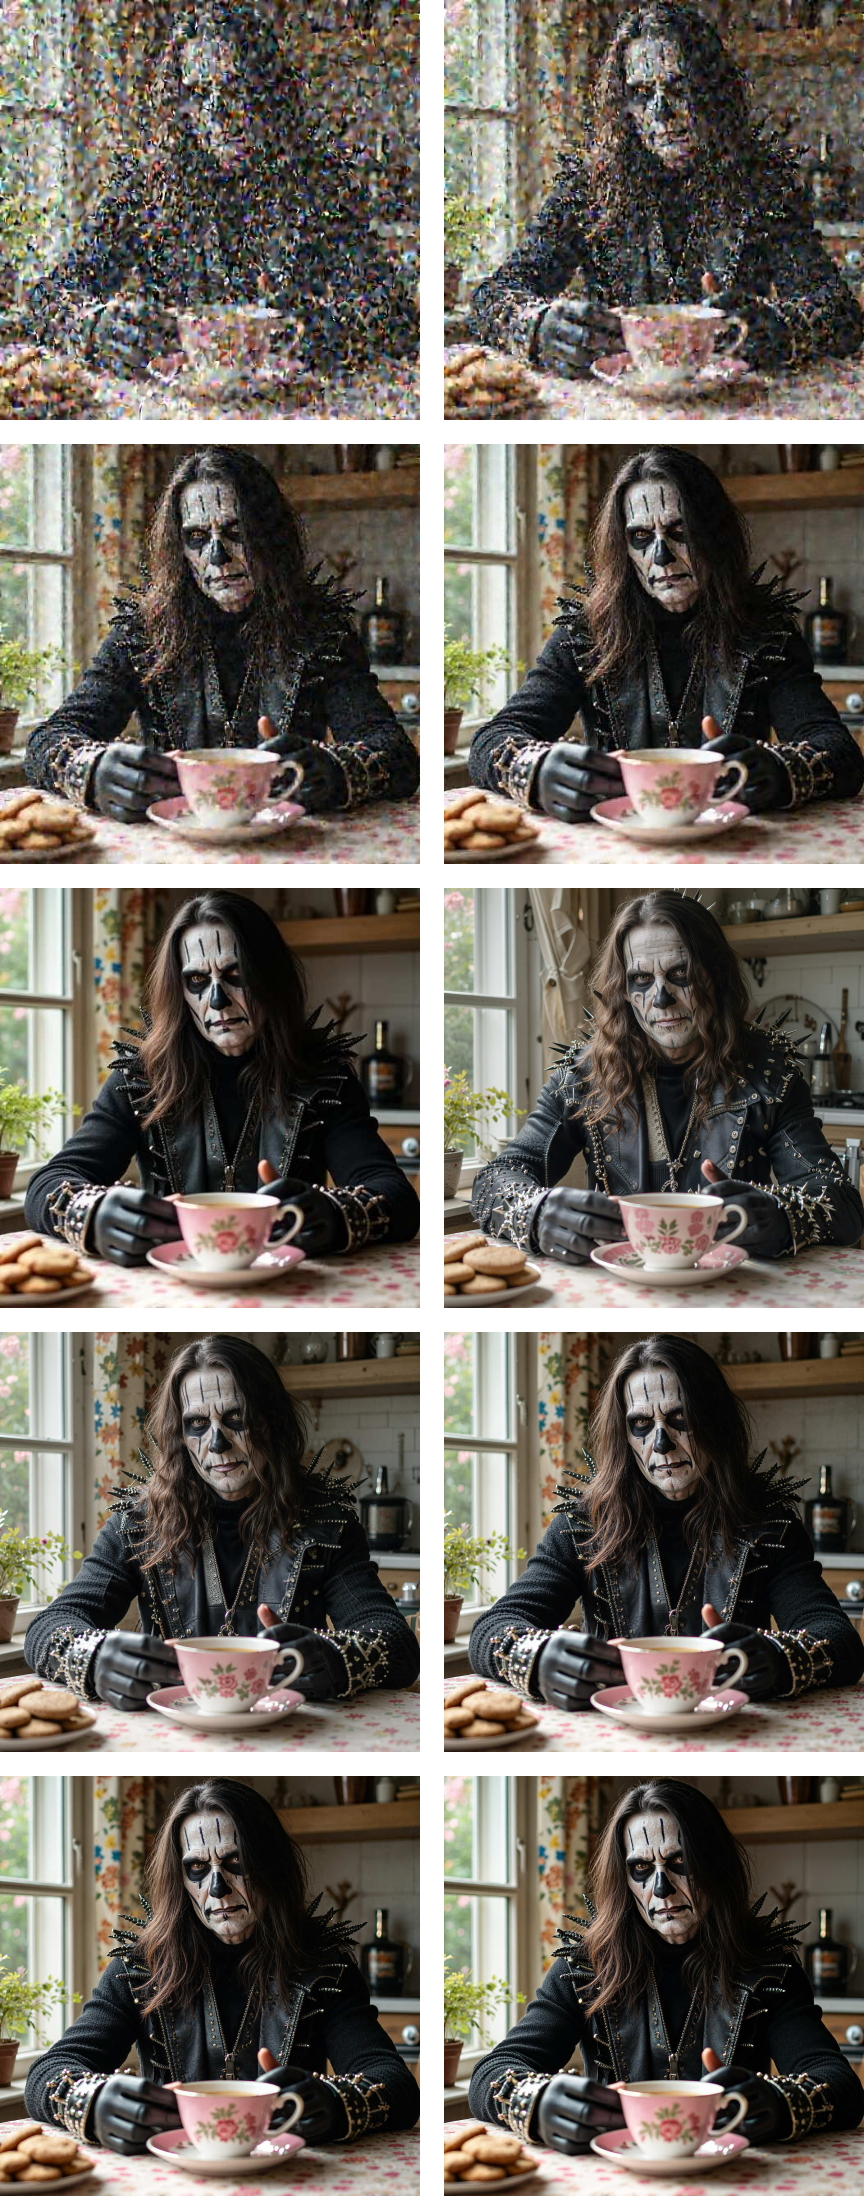
Figure 7 解读:上排是不同 LDM termination step 的 VAE decoding,下排是 PiD decoding。full-step 时,PiD 更忠实于 VAE decoding 的结果;中间 step 时,latent 还没有把所有细节定死,PiD 会生成额外细节。这个现象支撑了 early-exit 设计:最优点不是最早,也不是最后,而是语义已经成形但细节仍可生成的阶段。
5.4 Ablation: T2I prior and sigma-aware gate
| Method | MUSIQ↑ | NIQE↓ | DEQA↑ | MANIQA↑ | Q-Align↑ | Uni-IAA↑ | Uni-IQA↑ | VQ-R1↑ | PSNR↑ | SSIM↑ | LPIPS↓ |
|---|---|---|---|---|---|---|---|---|---|---|---|
| w/o T2I prior | 59.52 | 7.79 | 2.649 | 0.282 | 2.58 | 52.25 | 46.93 | 2.587 | 17.21 | 0.292 | 0.584 |
| w/o sigma-aware gate | 70.84 | 5.84 | 4.292 | 0.472 | 4.75 | 63.49 | 73.21 | 4.647 | 24.28 | 0.956 | 0.202 |
| Ours | 71.63 | 5.43 | 4.289 | 0.487 | 4.75 | 63.36 | 73.26 | 4.649 | 25.00 | 0.965 | 0.179 |
去掉 T2I prior 的影响最大,说明 PiD 不是一个普通 latent decoder,而是依赖 pixel diffusion prior 的生成能力。去掉 sigma-aware gate 后,多数 perceptual quality 与 fidelity 指标变差;尤其 small-text reconstruction 中 PSNR/SSIM/LPIPS 都落后于完整模型,说明“按 latent 噪声强度调节注入量”对局部可读性和保真度有实际作用。
5.5 Inference cost and 4K / native-2K comparisons
| Hardware / Decoder | Compile | 256px | 512px | 1024px | 2048px | 4096px |
|---|---|---|---|---|---|---|
| RTX 5090 latency ms | ✗ | 79.1 | 114.1 | 273.1 | 1388.8 | OOM |
| RTX 5090 latency ms | ✓ | 52.5 | 78.4 | 188.2 | 979.3 | 9238.0 |
| H100 latency ms | ✗ | 272.2 | 279.3 | 211.6 | 797.0 | 4763.4 |
| H100 latency ms | ✓ | 36.5 | 45.3 | 88.4 | 446.0 | 3754.6 |
| GB200 latency ms | ✗ | 265.1 | 260.8 | 251.2 | 505.1 | 2944.1 |
| GB200 latency ms | ✓ | 32.2 | 33.0 | 57.0 | 208.8 | 1927.3 |
| FLUX.1 VAE memory GB | ✗ | 0.3 | 0.7 | 2.6 | 37.0 | OOM |
| FLUX.1 VAE memory GB | ✓ | 0.4 | 0.8 | 2.4 | 16.7 | OOM |
| PiD memory GB | ✗ | 12.6 | 12.8 | 13.6 | 16.5 | 28.6 |
| PiD memory GB | ✓ | 10.3 | 10.3 | 10.9 | 13.0 | 22.5 |
PiD 在低分辨率时显存开销高于 VAE,因为 diffusion decoder backbone 本身较大;但分辨率升高后更稳定,4K compiled memory 为 22.5GB,uncompiled 为 28.6GB,而 FLUX.1 VAE 在 4096px OOM。2048px 下,compiled GB200 latency 为 208.8 ms,和主表 PiD compiled latency 一致。

Figure 8 解读:4K 对比展示 FLUX.1 [dev] 与 Z-Image 两个 base generator 的 VAE decoding 与 PiD decoding。VAE 只能在较低分辨率处输出或需要额外处理,PiD 则直接生成 4K 级像素,并在毛发、布料、文字/纹理等细节上更丰富。
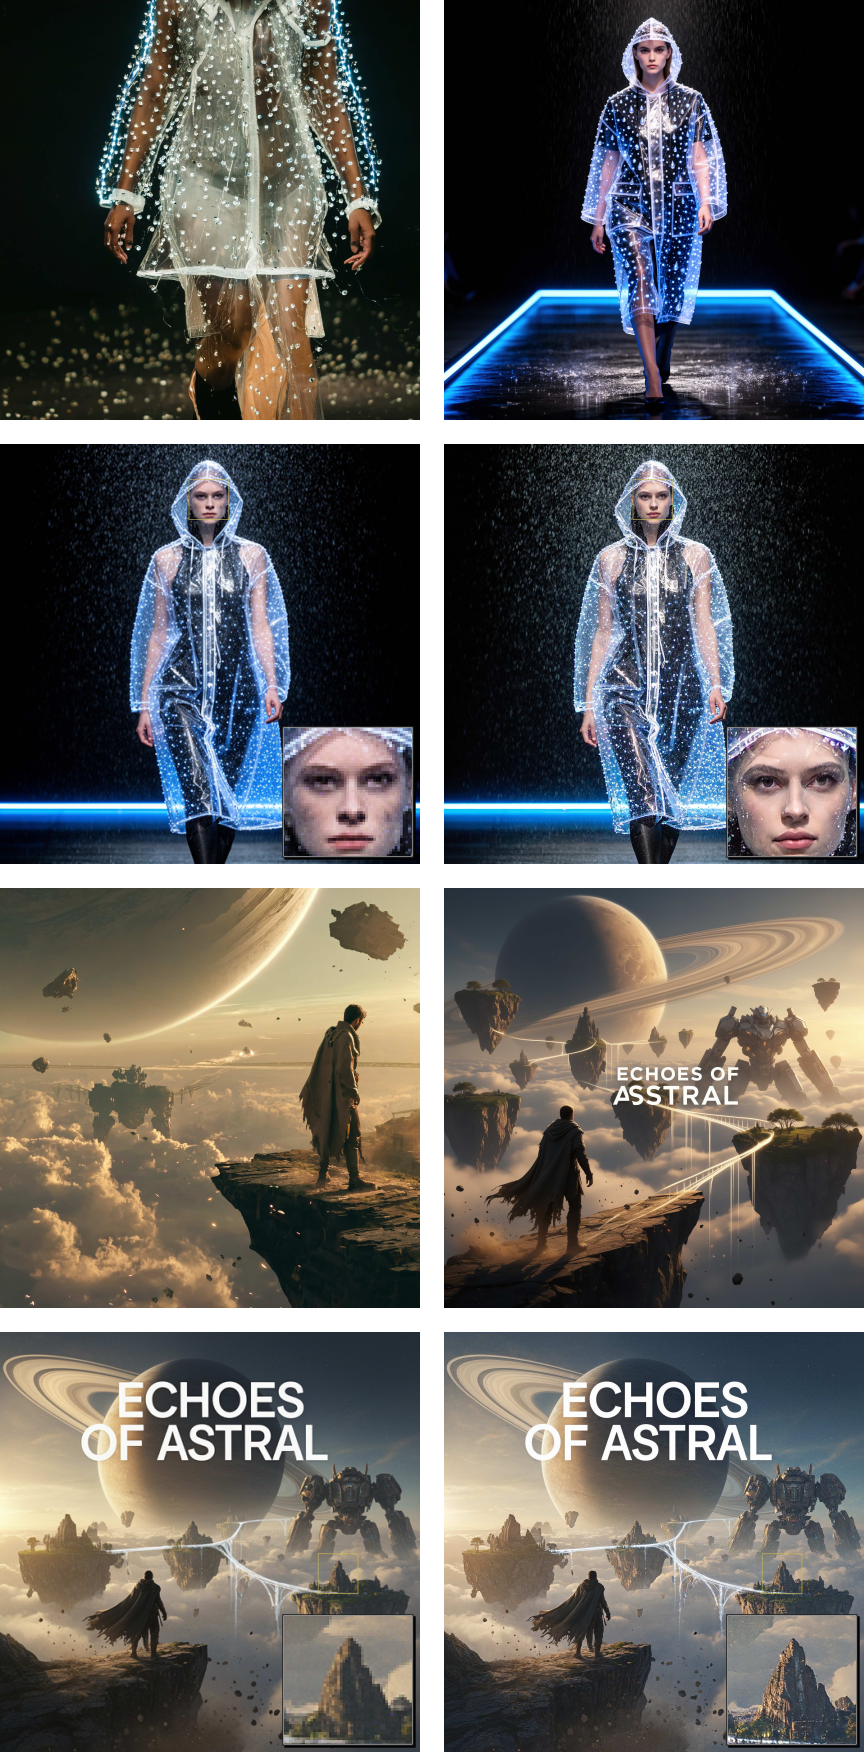
Figure 9 解读:这组图比较 native PixelDiT、native FLUX.2、低分辨率 FLUX.2 + VAE decoder,以及低分辨率 FLUX.2 + PiD。论文给出的单 GB200 未编译延迟约为 PixelDiT 13.3s、native FLUX.2 102.2s、低分辨率 FLUX.2 + VAE 6.6s、低分辨率 FLUX.2 + PiD 7.1s。结论是 PiD 用接近低分辨率 pipeline 的总成本,获得接近甚至局部超过 native high-resolution generation 的细节。
5.6 Limitations and takeaways
作者没有给出很长的 limitations section,但从方法和实验可以看到几个边界。第一,PiD 需要大规模高分辨率数据、PixelDiT prior 和昂贵训练;这不是一个只靠轻量 SR fine-tuning 就能复现的模块。第二,released repo 当前主要是 inference subset,训练和 DMD2 蒸馏代码未完整发布,因此复现实验训练成本和 loss 细节需要依赖论文描述。第三,PiD 的优势偏向 perceptual quality / details;在 small-text reconstruction 中,4-step student 的 PSNR 低于多步 teacher,说明逐像素保真和生成式锐化之间仍有 trade-off。
总体结论:PiD 的贡献不只是“一个更好的 decoder”,而是把 latent decoding 从 deterministic reconstruction 重新定义为 conditional pixel generation。实验表明,这个定义在 VAE latent、RAE/semantic latent、early-exit latent 和 4K decoding 上都能工作;最有价值的启发是,高分辨率生成不一定要让 base LDM 全程在高分辨率上采样,也可以让低分辨率 latent generator 与强 pixel diffusion decoder 分工。