TurboDiffusion: Accelerating Video Diffusion Models by 100-200 Times
Authors: Jintao Zhang*, Kaiwen Zheng*, Kai Jiang*, Haoxu Wang*, Ion Stoica, Joseph E. Gonzalez, Jianfei Chen, Jun Zhu Affiliations: Tsinghua University, Shengshu Technology, UC Berkeley arXiv: 2512.16093 GitHub: thu-ml/TurboDiffusion Year: 2025
1. Motivation (研究动机)
当前视频 diffusion 模型(如 Wan2.1/2.2)在单卡上生成一个 5 秒视频需要几十分钟甚至超过一小时(Wan2.1-T2V-14B-720P 在 RTX 5090 上需要约 4767 秒)。这严重限制了视频生成模型在实际场景中的应用。
现有加速方案存在以下不足:
- FastVideo 等框架仅实现了约 60-70x 加速,且在视频质量上有明显退化
- 单独使用 step distillation 或 attention 加速只能带来有限的加速比
- 大模型(14B)在消费级 GPU 上甚至无法运行(OOM)
核心问题:能否将多种正交的加速技术系统性地组合,在单张消费级 GPU 上实现 100-200x 的端到端加速,同时保持视频质量?
2. Idea (核心思想)
TurboDiffusion 的核心思路是将四种正交的加速技术进行协同优化(co-optimization),形成一个端到端的加速框架:
- Attention 加速:使用 SageAttention(低精度量化 attention)+ Sparse-Linear Attention (SLA)(稀疏 + 线性 attention 的混合)
- Step Distillation:采用 rCM(score-regularized Continuous-time consistency Model)将采样步数从 100 步压缩到 3-4 步
- W8A8 量化:将 Linear 层的权重和激活量化为 INT8,利用 INT8 Tensor Core 加速计算并压缩模型体积
- 工程优化:使用 Triton/CUDA 重写 LayerNorm/RMSNorm,CPU offload 等
这些技术之间的正交性是关键:
- SLA 的稀疏计算与 SageAttention 的低精度加速是正交的,可以叠加
- rCM distillation 通过 model weights merging 自然继承 SLA attention 的加速
- W8A8 量化与 attention 加速也是正交的
3. Method (方法)
3.1 Sparse-Linear Attention (SLA)
SLA 是 TurboDiffusion 的核心 attention 加速方案,将 sparse attention 和 linear attention 进行互补结合:
- Sparse Attention:通过 Top-K 选择最重要的 key blocks 来近似 full attention,保留全局信息但计算量大幅降低
- Linear Attention:使用 feature map 将 softmax attention 近似为线性复杂度,但单独使用精度不够
- SLA 组合:sparse attention 捕获关键的高频信息,linear attention 补充低频全局信息,两者输出相加
SageSLA 是 SLA 在 SageAttention CUDA kernel 基础上的高效实现,进一步利用 INT8 量化 Q/K 和 FP8 量化 V 来加速 sparse attention 部分的计算。
# Pseudocode: SageSLA Forward Pass
def sage_sla_forward(q, k, v, topk_ratio=0.1):
    """
    q, k, v: [B, H, L, D] - query, key, value tensors
    topk_ratio: ratio of key blocks to select (e.g., 0.1 = 90% sparsity)
    """
    # Step 1: Compute block-level importance map
    # 对 Q 和 K 按 block 分块,计算 block-level 的 QK score
    sparse_map, lut, real_topk = get_block_map(q, k, topk_ratio)

    # Step 2: Sparse Attention (SageAttention kernel)
    # 量化 Q, K 为 INT8,V 为 FP8
    q_int8, q_scale, k_int8, k_scale = quantize_qk_int8(q, k)
    v_fp8, v_scale = quantize_v_fp8(v)
    # 使用量化 kernel 仅在 top-k blocks 上计算 attention
    o_sparse = block_sparse_attn(q_int8, k_int8, v_fp8, lut, scales)

    # Step 3: Linear Attention
    # 对 Q, K 应用 feature map (softmax)
    q_feat = softmax(q)  # feature map
    k_feat = softmax(k)
    # O(L * D^2) 线性复杂度
    kv_sum = k_feat.T @ v           # [D, D]
    k_sum = k_feat.sum(dim=-2)      # [D]
    o_linear = (q_feat @ kv_sum) / (q_feat * k_sum).sum(dim=-1)

    # Step 4: Linear projection + combine
    o_linear = proj_l(o_linear)  # learnable projection, init to zero
    output = o_sparse + o_linear
return output代码映射:
SageSparseLinearAttention类 →turbodiffusion/SLA/core.py- Block map 计算 →
turbodiffusion/SLA/utils.py(get_block_map) - SageAttention CUDA kernel → 依赖
spas_sage_attn包(SpargeAttn) proj_l初始化为零 → 训练初期等价于纯 sparse attention,逐步学习 linear attention 的补充信息
3.2 rCM Step Distillation
rCM(score-regularized Continuous-time consistency Model)用于将预训练的 diffusion model distill 成一个少步采样模型:
- 基于 Rectified Flow formulation,将 TrigFlow timesteps 转换为 RectifiedFlow timesteps
- 训练后仅需 3-4 步即可生成高质量视频
- 通过 model weights merging 将 SLA finetune 和 rCM distillation 的参数更新合并到同一个模型
# Pseudocode: rCM Sampling (Inference)
def rcm_sampling(model, num_steps=4, sigma_max=80):
    """
    model: distilled model (SLA + rCM combined)
    num_steps: number of sampling steps (3 or 4)
    sigma_max: initial noise level
    """
    # Step 1: Define timestep schedule
    # TrigFlow → RectifiedFlow conversion
    mid_t = [1.5, 1.4, 1.0][:num_steps - 1]
    t_steps = [atan(sigma_max), *mid_t, 0]
    t_steps = sin(t_steps) / (cos(t_steps) + sin(t_steps))  # convert to RF

    # Step 2: Initialize with scaled noise
    x = randn(B, C, T, H, W) * t_steps[0]

    # Step 3: Iterative denoising (only 3-4 steps!)
    for i, (t_cur, t_next) in enumerate(zip(t_steps[:-1], t_steps[1:])):
        # Model predicts velocity
        v_pred = model(x, timestep=t_cur * 1000, text_emb=text_emb)
        # Euler step with stochastic re-noising
        x_denoised = (1 - t_next) * (x - t_cur * v_pred)
        noise = randn_like(x)
        x = x_denoised + t_next * noise  # re-noise for next step

return x # final clean sample代码映射:
- 采样循环 →
turbodiffusion/inference/wan2.1_t2v_infer.py中的主推理代码 - rCM 训练代码 →
turbodiffusion/rcm/目录 - 模型定义 →
turbodiffusion/rcm/networks/wan2pt1.py
3.3 W8A8 Quantization
W8A8 量化将 Linear 层的权重和激活都量化为 INT8,使用 block-wise 量化(block size 128x128):
# Pseudocode: W8A8 INT8 Linear Layer
class Int8Linear:
    def __init__(self, weight_int8, weight_scale, bias):
        """
        weight_int8: [out, in] INT8 quantized weights
        weight_scale: [out/128, in/128] per-block scales
        bias: [out] float bias
        """
        self.weight_int8 = weight_int8
        self.weight_scale = weight_scale
        self.bias = bias

    @classmethod
    def from_linear(cls, linear_module):
        # Block-wise quantization: 128x128 blocks
        weight = linear_module.weight  # [out, in]
        blocks = weight.reshape(out//128, 128, in//128, 128)
        scales = blocks.abs().amax(dim=(-1, -3)) / 127.0
        weight_int8 = (weight / scales).round().clamp(-128, 127).to(int8)
        return cls(weight_int8, scales, linear_module.bias)

    def forward(self, x):
        # Quantize activation to INT8 (also block-wise 128)
        x_int8, x_scale = int8_quant(x, block_size=128)
        # INT8 matmul on Tensor Cores
        output = int8_matmul(x_int8, self.weight_int8, x_scale, self.weight_scale)
return output + self.bias代码映射:
Int8Linear类 →turbodiffusion/ops/core.py- INT8 量化函数 →
turbodiffusion/ops/core.py(int8_quant) - GEMM kernel →
turbodiffusion/ops/gemm/目录(CUTLASS-based) - 模型替换逻辑 →
turbodiffusion/inference/modify_model.py(replace_linear_norm)
关键设计:proj_l(SLA 中 linear attention 的投影层)被 skip 不做量化,因为它是 float32 且对精度敏感。
3.4 FusedNorm 优化
使用 Triton 重写 LayerNorm 和 RMSNorm,替换 PyTorch 原生实现以获得更好的 GPU 利用率:
代码映射:
FastLayerNorm/FastRMSNorm→turbodiffusion/ops/core.py- Triton kernel → 使用
@triton.jit装饰器编写高效 GPU kernel
3.5 Training Pipeline
训练分为两个并行的过程,最后通过 weight merging 合并:
# Pseudocode: Training Pipeline
def training_pipeline(pretrained_model, data):
    # Phase 1a: SLA Finetuning (parallel)
    # 将 full attention 替换为 SLA,finetune 适配 sparsity
    sla_model = replace_attention(pretrained_model, attention_type="sla")
    sla_delta = finetune(sla_model, data)  # ΔW_sla

    # Phase 1b: rCM Distillation (parallel)
    # 使用 rCM 将 teacher → student (few-step)
    rcm_delta = rcm_distill(pretrained_model, data)  # ΔW_rcm

    # Phase 2: Weight Merging
    # 合并两个 delta,rCM 自然继承 SLA 的 attention 加速
    final_model = pretrained_model + sla_delta + rcm_delta

    # Phase 3: Quantization (post-training)
    final_model = quantize_w8a8(final_model, skip="proj_l")
    return final_model
训练基础设施支持:FSDP2(分布式并行)、Ulysses CP(context parallel)、SAC(selective activation checkpointing)。
4. Experimental Setup (实验设置)
Models & Baselines
| 模型 | 参数量 | 分辨率 | 任务 |
|---|---|---|---|
| Wan2.1-T2V-1.3B-480P | 1.3B | 480p | Text-to-Video |
| Wan2.1-T2V-14B-480P | 14B | 480p | Text-to-Video |
| Wan2.1-T2V-14B-720P | 14B | 720p | Text-to-Video |
| Wan2.2-I2V-A14B-720P | ~14B | 720p | Image-to-Video |
Baselines:
- Original:Wan 官方实现(100 步)
- FastVideo:使用 3 步采样 + 0.8 sparsity attention
Hyperparameters
- Top-K ratio: 0.1(对应 90% attention sparsity)
- 采样步数: 3 步(推荐范围 3-4 步)
- Top-K 推荐范围: [0.1, 0.15]
- 量化: W8A8, block size 128x128, INT8
Hardware
- 主要实验在 单张 RTX 5090 GPU 上进行
- 也在 RTX 4090 和 H100 上验证了加速效果(加速比略低于 5090)
5. Experimental Results (实验结果)
5.1 整体加速分解
TurboDiffusion 的加速来自四个层面的叠加,以 Wan2.1-T2V-14B-720P 在 RTX 5090 上为例:
| 阶段 | Latency | 加速比 |
|---|---|---|
| 原始 (Wan2.1-14B-720P) | 4767s | 1x |
| + CPU Offload | 3182s (OOM → 可运行) | - |
| + W8A8 & FusedNorm | 2783s | 1.14x |
| + rCM (4 steps) | 84s | 33.3x |
| + SageSLA | 24s | 3.45x |
| 最终 (TurboDiffusion) | 24s | 199x |

Figure 3 解读:左图为柱状图对比四个模型的 latency,TurboDiffusion 在所有模型上均实现了数量级的加速。右图为水平条形图展示具体加速倍数:Wan2.1-T2V-14B-720P 达到 199x,Wan2.1-T2V-14B-480P 达到 170x,Wan2.1-T2V-1.3B-480P 达到 97x,Wan2.2-I2V-A14B-720P 达到 120x。注意 I2V 模型因为需要在 high-noise 和 low-noise 模型之间切换,实际测量的加速比略低于理论值。

Figure 4 解读:Waterfall 图展示了各优化技术的逐步加速贡献。从 4767s 开始,CPU Offload 使得模型可以在单卡上运行(否则 OOM),W8A8 + FusedNorm 带来 1.14x 加速(压缩模型大小和计算量),rCM 是最大的加速贡献者(33.3x,将 100 步减少到 3-4 步),最后 SageSLA 提供额外 3.45x 的 attention 加速。这四种技术的组合最终达到约 200x 的总加速比。
5. Results
5.1 端到端加速性能
| 模型 | Original | FastVideo | TurboDiffusion | 加速比 |
|---|---|---|---|---|
| Wan2.1-T2V-1.3B-480P | 184s | 5.3s | 1.9s | 97x |
| Wan2.1-T2V-14B-480P | 1676s | 26.3s | 9.9s | 170x |
| Wan2.1-T2V-14B-720P | 4767s | 72.6s | 24s | 199x |
| Wan2.2-I2V-A14B-720P | 4549s | N/A | 38s | 120x |
5.2 视频质量对比
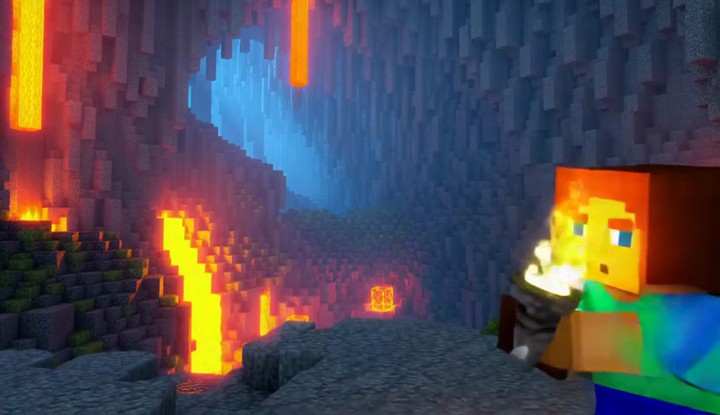
Figure 1 解读:Wan2.1-T2V-1.3B-480P 模型在 “东京街头红裙女性” prompt 下的视频帧对比。Original 需要 184 秒,TurboDiffusion 仅需 1.9 秒。TurboDiffusion 生成的视频保持了人物外观一致性、场景光影效果和运动自然度,整体质量与原始模型相当。
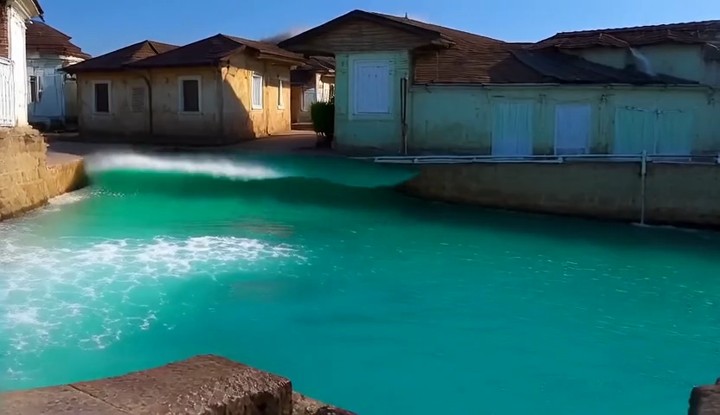
Figure 5 解读:Wan2.2-I2V-A14B-720P 模型的 Image-to-Video 生成对比(冲浪猫 prompt)。Original 需要 4549 秒,TurboDiffusion 仅需 38 秒(120x 加速)。在 I2V 任务中,TurboDiffusion 成功保持了第一帧图像的视觉一致性,同时生成了流畅的运动。
5.3 与 FastVideo 的质量对比
在 Wan2.1-T2V-1.3B-480P 上,TurboDiffusion 不仅比 FastVideo 快(1.9s vs 5.3s),视频质量也明显更好:
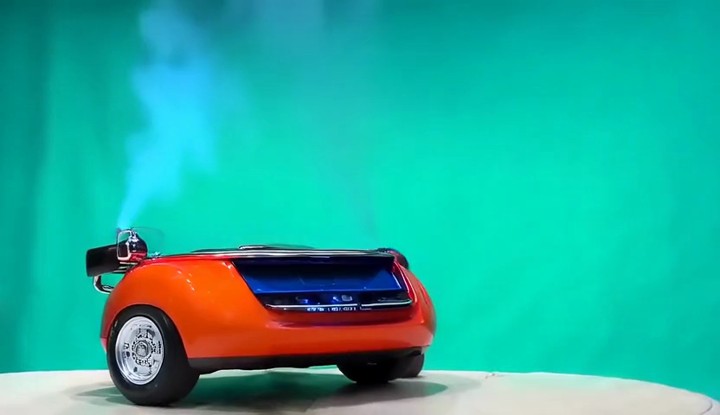
Figure 13 解读:在 “复古电视墙” prompt 下的三方对比。FastVideo(5.3s)生成的视频出现了严重的色彩偏移(整体偏绿),内容细节丢失。TurboDiffusion(1.9s)在更快的速度下保持了更好的色彩准确性和场景一致性,接近 Original(184s)的质量。
5.4 大模型 720P 对比

Figure 24-27 解读:Wan2.1-T2V-14B-720P 模型上的对比。在此配置下 TurboDiffusion 达到了最高的 199x 加速(4767s → 24s)。与 FastVideo(72.6s)相比,TurboDiffusion 在速度上快 3x,且在复杂场景(如梵高风格街头、Minecraft 洞穴、新闻纪录片)中保持了更好的细节和运动一致性。
5.5 关键发现
- 加速比随模型规模增大而增大:1.3B 模型 97x → 14B-720P 模型 199x。这是因为大模型的 attention 计算占比更高,SLA 的加速效果更显著
- W8A8 量化使大模型在消费级 GPU 上可运行:14B 模型原本 OOM,量化后模型体积减半,可以在单张 RTX 5090 上运行
- rCM 是最大的加速贡献者(33x),SageSLA 提供额外 3.5x
- 未来方向:扩展到 autoregressive video diffusion 等更多范式